Phase2 UI: Instructions for SPRAT
Introduction

FIG. 1. The SPRAT Instrument Config Creation Window. (Click to enlarge.)
SPRAT observations usually consist of two steps:
- Slew and acquisition using SPRAT in its imaging mode to place the target on the slit.
- Configure SPRAT for spectroscopy and take one or more spectral images, along with an Arc for calibration.
For the first phase SPRAT is used in its imaging mode, i.e. without the slit and grism in the beam. Images are taken so that the target can be identified and moved onto a "magic pixel" on the detector. The slit and grism are then inserted into the beam so that spectroscopic observations of the target can be acquired.
In almost all cases, these observations should be defined using the phase 2 "Wizard".
The Basic Wizard Sequence
The Wizard guides users through the steps needed to acquire a target in imaging-acquisition mode, and then obtain the data needed for a fully-reduced spectrum.
To create an observing "group", with the proposal highlighted in the main phase2 window, click on the Create a Group button top-right to insert timing and observing constraints. Check out the Phase 1 web-page if you are not sure about the meaning of the various timing constraints. The new group will appear as an item "within" the proposal in the main window. Highlight this group and select Create New Observing Sequence. From the subsequent pop-up select the Wizard for SPRAT option and click Continue.
In the (Create) Imaging Spectrograph Sequence Wizard window users can select an existing target (or add a new target to the list available to the programme), select the acquisition mode (WCS or BRIGHTEST, discussed below), and either select an existing Instrument configuration or create a new one.
Creating a New Instrument Config
If you have not previously used SPRAT you will need to create a new config. Once a config has been created it is available to all proposals in the same programme and can simply be re-used without creating a new one every time.
To create a new config, click on the Create Instrument Config button. In the Instrument Config Creation window (shown right), enter a meaningful Instrument Config Name, leave the Instrument Name set to SPRAT, leave Binning set to 1x1, leave the Grism position and Slit set to IN BEAM, and choose between RED OPTIMIZED and BLUE OPTIMIZED for the Grism rotation, depending on whether you are most interested in the red or blue end of the spectrum (see below for further details). Click Create to generate this new SPRAT config. The config is now available to select from the SPRAT wizard for use with this or any other group in your programme.
Producing an Observing Sequence
You are now ready to add the necessary steps to your Sequence of observations. From the (Create) Imaging Spectrograph Sequence Wizard window (shown below), click on the Config button to add the Instrument configuration you've just created, Expose to define the duration and number of spectroscopy exposures and Arc to add a final arc spectrum to the end of the sequence. A simple observing sequence should look something like this:
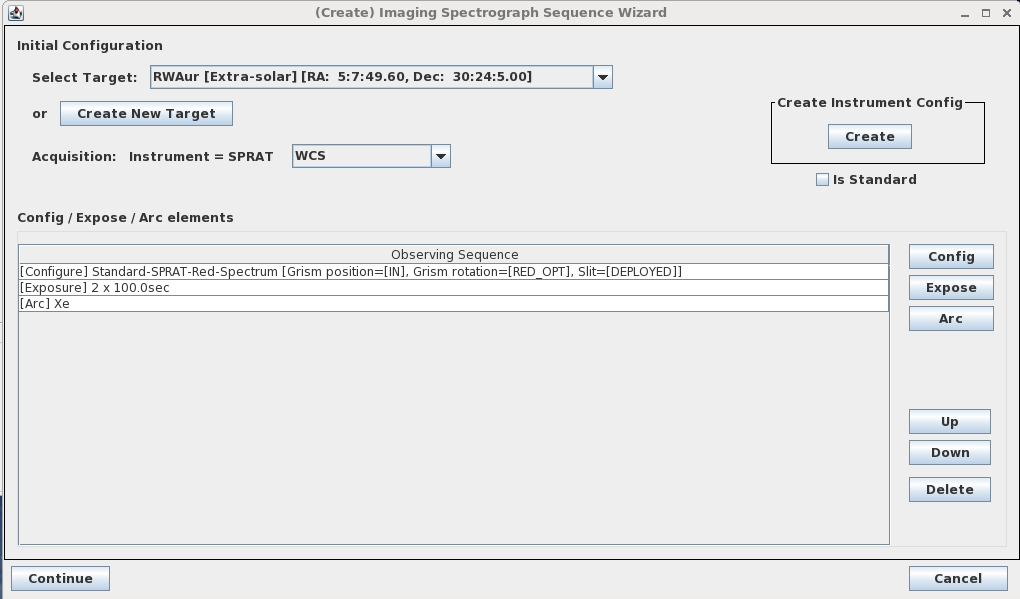
FIG.2. The SPRAT wizard after selection of an instrument config, an exposure time and number of exposures (in this case two 100 sec spectra will be acquired), and an Arc (click to enlarge).
Click Continue to add the sequence to the group you are creating. The system will display the observation sequence in its entirety. You will note that autoguider and other mandatory configuration commands have been added automatically above the exposures you specified.
Click Continue again to proceed. In the main Phase2 window (with the new group highlighted) the Create New Observing Sequence button bottom-right is replaced with buttons which allow you to display, edit, or even delete the observing sequence associated with the group. If you display the sequence it should look something like this:

FIG.3. A typical SPRAT wizard sequence (click to enlarge).
The above sequence contains the following steps:
- SLEW: Slew to target. Only one target is possible per group when using the wizard.
- FOCAL PLANE: Set the Focal plane for SPRAT observations. (This sets the nominal centre of the focal plane pointing model.)
- FINE TUNE: Configure SPRAT for imaging acquisition in WCS_FIT mode (initially, a coarse acquisition to within an arcsec or so is performed). Execute acquisition.
- AUTOGUIDER CONFIG: Acquire a guide star and switch on the autoguider.
- FINE TUNE: With SPRAT still configured for imaging acquisition, execute a higher-precision acquisition, again with WCS_FIT mode (to within ~0.5 arcsec).
- IMAGING SPEC INSTRUMENT CONFIG: Configure the instrument to image the slit, i.e. insert only the slit into the beam.
- EXPOSE: Obtain a 10 sec image of the slit; allows future confirmation that slit and acquisition both functioned correctly.
- IMAGING SPEC INSTRUMENT CONFIG: Configure the instrument for spectroscopy, i.e. with the slit and grism in the beam. Here the instrument is optimised for red wavelengths.
- EXPOSE: Obtain science spectra, in this case two 100 sec exposures.
- ARC: Obtain a Xenon arc spectrum.
- AUTOGUIDER CONFIG: Switch the autoguider off.
The Observation Sequence window will also give an estimate of the duration of the group, including overheads, and will give the results of a validation check. This check is not exhaustive, though it should highlight any major problems with your observing group.
Finally, make sure the group is enabled (see box top-right in the main Phase 2 window). Your observing group will be uploaded to the database and will be immediately available for execution. The group may also be copied or "cloned" if the same observations are required of other targets. Simply rename the group and select a different target.
Further Details
Acquisition
Both coarse (NORMAL-PRECISION) and fine (HIGH PRECISION) acquisition steps should be used with SPRAT. The former positions the target very close to the slit; the latter should move the target onto the slit after the auto-guider has been switched on. In all likelihood the coarse acquisition will move the target onto the slit. However, switching on the guider may then move the target off the slit; hence a second acquisition step is always recommended after the Autoguider ON command.
Targets are usually acquired by taking images with SPRAT itself, with the slit and grism removed from the beam. There are two ways in which the target can be identified and moved onto the slit: either a WCS astrometric fit is applied to the images to identify the source, or the brightest object in the image is assumed to be the target.
For the BRIGHTEST acquisition mode a 1 sec image will be obtained. BRIGHTEST requires that your target is the brightest object within the entire field-of-view of the CCD (assume an 8 arcmin field diameter). BRIGHTEST should be used with very bright targets (V < 8 mag), since WCS acquisition is frequently ineffective for sources that may be saturated in the acquisition images.
For most objects, WCS_FIT acquisition is preferable. In this case a longer, 10 sec image is obtained. The pipeline will attempt to fit world coordinates to all of the stars within the full field-of-view of the image (7.5 x 1.9 arcmin for SPRAT). If the system fails, it will retake the image and try the fit again. The system will make a handful of attempts before giving up on your group with a "WCS_FIT acquisition failure" error. Cloud and/or poor seeing can be detrimental to this acquisition process.
With WCS_FIT acquisition you must use precise J2000 co-ordinates. The position of your target must be accurate to < 0.5 arcsec to ensure the target will be placed on the slit. Depending on the provenance of the original catalogue it is quite common for coordinates in on-line databases such as SIMBAD to be insufficient. If you do not already have recent astrometry, consider checking your coordinates first with a brief (IO:O) snapshot image taken a day or two before investing valuable telescope time in long SPRAT integrations.
Rotator Setting
In order to minimise slit losses due to atmospheric refraction, we recommend that the slit position angle is set to the parallactic angle. This is the default setting chosen by the wizard, and is equivalent to a cassegrain mount rotator angle of 11 degrees.
Autoguiding
Although it is possible to disable the autoguider (AG) when observing with SPRAT, we encourage all users to set guiding to ON or at the very least ON-IF-AVAILABLE. The AG is always set up correctly by the Wizard.
Defocus
The system automatically applies all offsets required to keep the instrument in focus. It is highly unlikely that your target will be too bright for spectroscopy, though if it is please contact LT support for instructions and guidance on how to defocus the telescope.
Binning
At the present time all data should be obtained with 1x1 binning. We do have the option of binning spectral images, though users requiring this mode should discuss their needs with LT support before trying to implement this option.
Optimisation for Red or Blue spectroscopy
As noted in the main SPRAT instrument web page, the grism may be set to two different configurations which are optimised for "blue" or "red" throughput. This essentially means that the signal-to-noise ratio will be as much as 50% better above ~6000 Angstrom if red is chosen, and 50% better below ~6000 Angstrom if blue is chosen. See the example spectra presented on the SPRAT instrument page.
Calibrations
Bias and Darks. There is generally no need for observers to obtain bias or dark frames. These are acquired and updated periodically by the system, and used by the automated data reduction pipelines by default.
Spectral Arcs. SPRAT is mounted on a cassegrain port on the telescope and, although it is a relatively compact instrument, flexure may subtly affect calibrations. We therefore suggest that all users obtain an arc at the end of each group. We recommend using only the Xe arc lamp for SPRAT (the exposure time will be set automatically). Data will be wavelength calibrated by the SPRAT pipeline. The SPRAT web page also includes a Xe arc atlas for reference.
Sky Subtraction. Separate sky exposures are generally not required. The pipeline software will extract blank sky spectra from rows adjacent to the source and subtract these from the target spectrum. Both sky-subtracted and non-sky-subtracted spectra are produced by the pipeline and made available to users. Those wishing to observe very extended sources should discuss their requirements with LT Phase 2 support.
Using the SequenceBuilder
On the very rare occasion that the wizard does not produced a suitable group, observation sequences may be created by hand using the Manual Sequence Editor. One might, for example, want to re-acquire the target before repeating a number of long exposures. Target acquisition with IO:O might also be needed, since IO:O has a larger field of view than SPRAT.
To generate a sequence by hand, with a new group highlighted select Create New Observation Sequence, and EITHER use the Wizard to create a template sequence which you can then edit, OR go straight to the Manual Sequence Editor and create the sequence from scratch. We STRONGLY RECOMMEND that all users do the former, i.e. use the Wizard first. All SPRAT sequences should include most, if not all, of the steps defined by the Wizard.
A few examples of non-standard observing sequences are discussed below.
Using IO:O as the Acquisition Instrument
Acquisition using IO:O is also possible and may be preferable if the field of view of SPRAT is insufficient for a good WCS fit. Users must edit the initial '[Focal Plane]' setting and the two '[Fine Tune]' steps in their sequence, in each case selecting IO:O rather than SPRAT.
Please Note: SPRAT Level 2 flux calibration is not possible if using IO:O as acquisition instrument for SPRAT.
To edit your sequence, open it with Edit Observing Sequence, highlight the line you wish to change, and click Edit. When changing the [Fine Tune] acquisition instrument, select IO:O from the Acquire using pull-down menu but leave the Science Instrument (with target pixel) set to SPRAT. Allow alternative acquisition instrument should also be left as NO. Repeat this step for the second [Fine Tune] line in the sequence, as shown below.
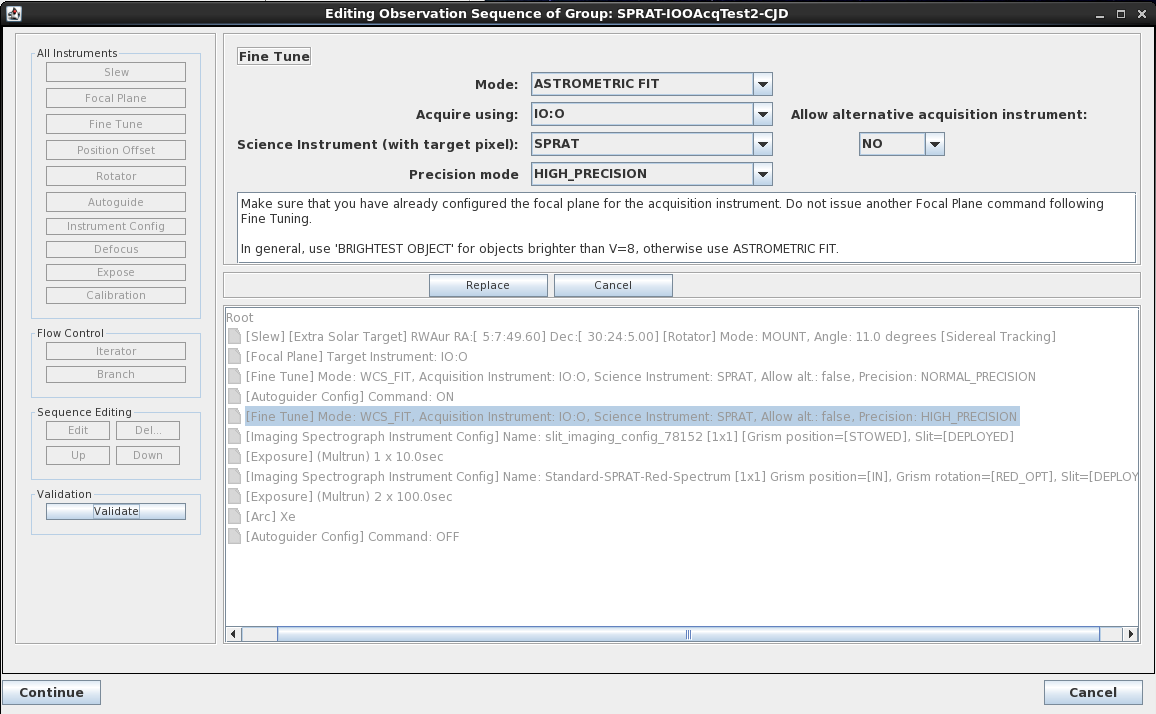
FIG.4. Editing a SPRAT sequence so that IO:O is used for imaging acquisition (click to enlarge).
In the updated sequence the [Focal Plane] Target instrument should now be set to IO:O, as should the two [Fine Tune] acquisition instruments (the same acquisition instrument should be used for both the normal-precision and high-precision steps in the sequence). The Mode should also still be set to WCS_FIT. The Mode `could` be set to BRIGHTEST, though in such a case acquisition using SPRAT itself should be possible.
Note that, while acquisition using IO:O is possible, acquisition using SPRAT itself is always preferable. With IO:O acquisition the telescope tertiary mirror must be inserted into the beam and rotated to redirect the target from IO:O on to the very narrow SPRAT slit after the acquisition process. There is thus room for additional error in positioning of targets on to the slit.
Observing Two Targets from the Same Group
The simplest way to "add" a second target to a sequence is to prepare a basic observing group using the Wizard and then use the Edit Observation Sequence window (shown above in Fig.4) to add the necessary steps for the second target. In this window, highlight the "Root" line at the top of the sequence, and use the various buttons on the left of the window to add the new target, a focal plane command, acquisition and auto-guiding commands, the instrument configs (for imaging the slit and then for taking the spectrum), and the exposures. The commands can be moved up and down in the sequence using the up and down buttons. They can be edited or deleted as necessary.
Make sure that all necessary steps are included, and that all settings are exactly as they appear for the first target. The only reasonable exception is the acquisition mode, where WCS_FIT might be appropriate for one target and BRIGHTEST better for the other. Pay particular attention to the rotator setting (the "[Rotator] Mode" in the Slew command) and the configuration used for the slit imaging and the spectroscopy.
The order of the various steps in the final sequence is important. The [Focal Plane] should be defined after the slew to each target, but before the two [Fine Tune] commands. The guider should be switched on between the NORMAL and HIGH PRECISION acquisition steps; it should always be switched off before slewing to the second target.
Your observing sequence should eventually look something like this:

FIG.5. A sequence for observing two targets within the same group (click to enlarge).
The sequence shown above only contains one Arc exposure. Repeating the arc directly after both targets is probably not necessary, though if precise wavelength calibration is important a second arc could be included halfway down the sequence, before switching the AG off and slewing to the second target.
We realise that creating a group to observe two targets is a little convoluted! If you have any problems with this process, or would like LT staff to check your group, please don't hesitate to contact LT Phase2 support. Note that we do not routinely check submitted groups; anything you prepare in the phase2 that is set to "enabled" will be immediately available for observation.
Finally, remember that any group can easily be cloned and reused for another target by simply clicking on the Clone Group button on the main phase2 window. The targets in the new group may then be changed (highlight each and "Edit" them) and the exposure times updated as necessary.
Placing Two Targets on the Slit
It is possible to set the SPRAT slit position angle (PA) to observe a pair of adjacent objects at the same time. This involves setting the cassegrain derotator to a very specific angle instead of using the parallactic angle (the Wizard will automatically select the latter). The trick is to select the correct angle, since of course the PA or PA+180 degrees would put the two targets on the slit.
If the derotator is not set to the parallactic angle, users should expect increased slit losses and, more importantly, slit losses that are chromatic making spectro-photometry impractical.
The cassegrain derotator on the LT only has a full range of travel of 180 deg. SPRAT is mounted on the telescope so that the parallactic angle is in the middle of this range, thereby maximising the amount of time an object can be tracked. Users who select a derotator angle that is near one of the ±90 deg limits run the risk of running out of tracking range, although this should only be an issue for very long groups (several hours) or when tracking an object close to the zenith where the derotator moves quickly.
There are of course two equivalent sky PAs which would place a pair of objects on the slit. However, because of the limited range of the derotator, only one of these two angles will be available at any one time. Moreover, the two targets may be observable for much longer with one angle than the other. Users must therefore use the Rotator Selection Tool in the phase2ui to choose between these two angle.
In the example shown below (Fig.6), the duration of the group, programme, target and date are entered. The Type of angle is set to "Sky angle", and the instrument is set to "SPRAT". Clicking Create Chart produces the graph. The two sources that correspond to NP193 lie on an axis with a PA (E of N in equatorial coordinates) of 241 deg. This means that the cassegrain derotator must be set to either a sky PA of 241 deg or 61 deg. On the specified date a PA of 241 deg is available from about 01:00 when the object rises until 05:15 UTC (i.e. for over four hours). At that point PA = 241 deg becomes impossible (the plot turns red) because the de-rotator hits the end of its travel. A derotator angle of 61 deg would now work. However, sunrise occurs at about 07:00. The best PA for this particular pair of targets at this time of year is therefore 241 deg.
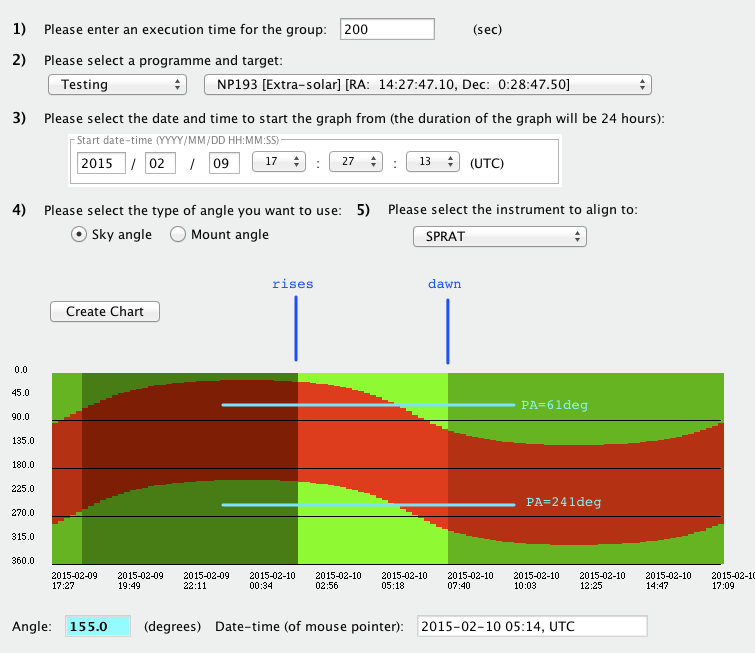
FIG.6. The rotator tool showing allowed cassegrain de-rotator angles on a specific date, for a specific target. Darkest shading - target set; middle shading - daytime; unshaded green - available derotator angles; unshaded red - unavailable angles. (click to enlarge).
To change the PA of the cassegrain derotator, create a 'normal' group using the Wizard. From the main phase2ui window highlight the group and click Edit Observation Sequence. In the 'Editing Observation Sequence ' window highlight the [Slew] row and click Edit. Change the Rotator to 'Sky' and enter the desired PA. 'Align to Instrument' should of course be set to SPRAT.
Slitless spectroscopy
Obtaining slitless spectra, that is, spectra without the slit in the beam, is certainly possible with SPRAT. Simply create a sequence as described above using the Wizard. From the main Phase2 window highlight the group and select Edit Observing Sequence. In the subsequent editing window (Fig.4 above), highlight the [Imaging Spectrograph Instrument Config] line and click on edit (bottom-left). Create a new Instrument Config (with a suitably descriptive name) with the Grism position set to IN BEAM but the Slit set to OUT OF BEAM; remember to set the Grism rotation as needed. Having created the new config, click Replace to replace the existing Instrument Config with the new, slitless config. The [Imaging Spectrograph Instrument Config] line should now list the Slit as [STOWED].
Guiding and Tracking
Whenever possible SPRAT spectra should be obtained with the autoguider switched on. However, if no guide star is available, users may wish to try observing with only sidereal tracking. Open the sequence with Edit Observing Sequence, highlight the [Autoguider Config] line, and click Edit. From here users may select Yes, Off, or On if Available.
At the present time, non-sidereal tracking of targets with SPRAT has not been commissioned.
And finally...
Needless-to-say, mistakes can be made when editing a group or when setting one up from scratch. Groups can be validated, though this analysis is not fool-proof. If you are attempting to create a more complicated sequence than is possible with the wizard, we strongly recommend that you still use the wizard to create the framework of a standard spectroscopy group and then edit that sequence to add your extra requirements. Be sure to let us know what you have done by emailing LT Phase 2 support to enable us to offer advice if we foresee any problem - note that we do not routinely check groups! For further general information see this description of the Sequence Builder; users may also find the FRODOSpec Sequence Builder Tutorial useful, though please be aware that there are subtle differences between the two instruments.