Phase2 UI: Instructions for IO:I
Introduction
Observations with IO:I should in almost all cases be prepared using the phase2UI "Wizard". This tool allows users to quickly and easily create an observing "group", which can then be copied or "cloned" and re-used for other targets, or edited as necessary. The functionality of the Wizard is described below.
PLEASE NOTE: IO:I observations are prepared in almost the same way as observations with IO:O. Those new to the phase2 should read the IO:O phase2 UI instructions first.
This page only describes the unique features of using IO:I. Briefly, there are two issues:
Observations should always be obtained as a dithered sequence. The dithering allows the automated reduction pipeline to correctly remove dark current, thermal glow and sky background. Whilst it is technically possible to take a single exposure on IO:I, data reduction will be neither automated by us nor straight forward for you.
Second, the thermal background in the IR places a maximum integration time before the entire frame simply saturates. Best results are obtained with many, dithered, short exposure. Please check the IO:I instrument page for the most up to data information, but in most circumstances the maximum integration time is 60sec. A one hour total integration would typically be achieved by placing two 30×60sec multruns in your observation sequence.
The Basic Wizard Sequence
The Wizard guides users through the steps need to acquire a target, configure the instrument, and take a sequence of dithered images.
Create an observing "group" following the guidelines given on the IO:O phase2 web-page. Please consult the Phase 1 web-page if you are not sure about the meaning of the various timing constraints. Highlight the new group and select Create New Observing Sequence. From the subsequent pop-up select the Wizard for Multicolour Photometry option and click Continue.
In the (Create) Photometric Sequence Wizard window shown below (Fig.1) users can select an existing target (or add a new target to the list available to the programme); select the cassegrain rotator setting (described below — for most people Automatic (Cardinal) is appropriate); and apply a focus offset for very bright targets (we recommend using +ve values — see below). The same wizard is used for IO:I, IO:O and RISE, so in this case IO:I should obviously be selected from the Aligned to and Instrument pull-down menus.
IMPORTANT: Because of the dithering needed to acquire near-IR images, the Autoguider must be set to OFF. Please do not select Yes or On if available.
The sequence of images themselves are defined by either loading an existing Instrument Config, or by creating a new Config and using that (click on the New button to create a config). With IO:I only one filter is available at any one time. Please therefore be careful to select the correct filter. Also, at the present time only binning 1x1 is available. In the Instrument Config Creation window assign a sensible Instrument Config Name and click Continue. This config can then be selected in the main (Create) Photometric Sequence Wizard window.
Finally, select an exposure time and number of exposures. The latter also defines the number of telescope dither positions that will be used; the offsets will be defined automatically by the system using its pre-defined dither patterns. In the example below five 20 second exposures are requested and the centres of this five frames will describe a cross on the sky. Click Add to Observation List to add these observations to the group. For best results we recommend a minumum of five exposures to allow good sky subtraction. Three produces passable but imperfect results. More is better.

FIG.1. The IOI-wizard being used to create a sequence of imaging observations. In the above example five dithered 20 second exposures will be obtained. (Click to enlarge.)
The system will display the observation sequence in its entirety. The sequence will include all mandatory steps, in the correct order, needed to secure your observations. An example is shown below.
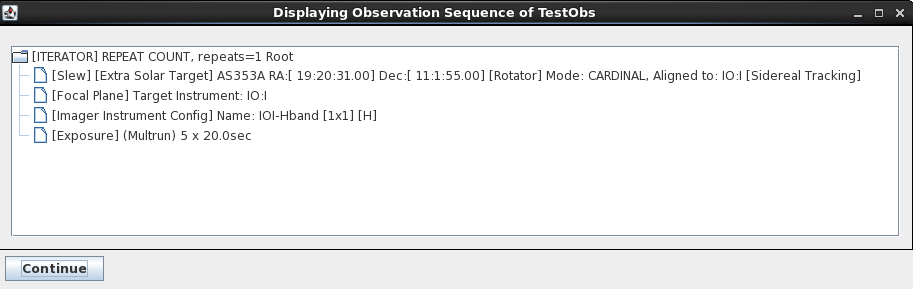
Fig.2. A simple IOI sequence. In this case five 20 second H-band images are secured. (Click to enlarge.)
Click Continue in the above window to return to the main Phase2 window. With the new group highlighted, the Create New Observing Sequence button bottom-right is now replaced with buttons which allow you to display, edit, or even delete the observing sequence associated with the group. If you display the group the system will estimate the duration of the observations, including overheads, and will give the results of a validation check. This check is not exhaustive, though it should highlight any major problems with your observing group.
Make sure the observing group is enabled (see box top-right in the main Phase 2 window). When enabled the group is automatically uploaded to the telescope database and will be immediately available for execution.
Finally, use the VALIDATE button to allow the software to perform its validity and common mistake checks.
The group may also be copied or "cloned" if the same observations are required of other targets. Simply rename the group and select a different target.
Further Details
Rotator Setting
The cassegrain rotator (or strictly speaking 'de-rotator', since it corrects the rotating sky), sets how the image is orientated with respect to equatorial North and East. Two options are available to users, AUTOMATIC or MANUAL.
- AUTOMATIC orients the cassegrain derotator so that rows and columns in the image are aligned with one of the cardinal sky orientations: N, E, S or W. The system automatically chooses the field orientation that gives the longest available observation duration without encountering the rotator axis limits. Be sure to select IO:I from the instrument drop down list when setting this parameter.
- MANUAL allows users to explicitly set the field orientation, either as a sky position angle or as the mechanical mount angle of the cassegrain derotator. With MANUAL selected, after creating an exposure, simply click "Continue" and the wizard will take you to the rotator specification screen.
In most cases we advise leaving the rotator set to automatic (CARDINAL in the above sequence), unless a sequence is both longer than a couple of hours in duration and passes near the zenith. In such cases a specific angle may need to be defined so that the cassegrain rotator limit is not reached before the end of the observation. For a detailed discussion, please read the Cassegrain Rotator guide and/or contact LT Phase 2 support for assistance.
Autoguiding
All IO:I observations should be acquired with the autoguider set to "Off". This is to allow the telescope to dither between exposures. With the short exposures required for near-IR imaging, observing without the auto-guider locked should not seriously impact the image quality obtained. The automated data reduction pipeline will align and stack all the individual frames for you.
Dithering (number of exposures) and Exposure Time
So that the data reduction pipeline can properly reduce your near-IR images, it is vital that a number of "dithered" observations are acquired. The system will automatically set up the telescope offsets between each position in the dither pattern; all the user need do is define the number of exposures in the dither sequence. We recommend obtaining at least five images in a sequence. The pipeline will use all the images when creating a median-averaged sky frame. This sky will be subtracted from each image, before the images are aligned and co-added. The more dither positions you use, the more robust this process is. Nine frames has been shown to produce excellent results. See the main IO:I web-page for further details.
The exposure time used for each image should not be too short - since the group would then be inefficient and background-limited performance is desirable, nor too long - since the detector could saturate on the sky background, particularly in the H-band where OH airglow is very bright. Please consult the main IO:I web-page for latest guidance on the best exposure times to use with each filter, but in general expect to use exposures in the range 6–60 sec.
Using the Sequence Builder
For information on how to use the sequence builder with one of the imagers on the LT, please consult the IO:O phase2 web-page. See also the Sequence Builder web-page for a general description of all of the available functions or the Sequence Builder Tutorial for an introduction to using the sequence editor.