Phase2 UI Advanced Tutorial:
using the Sequence Builder
This tutorial provides one example of using the Sequence Builder to create a group which is more complicated than can be achieved with the simplified wizards. We will create a group containing spectra of both a science target and an offset sky, presumably because the main target is an extended source which fills the the IFU field-of-view leaving no unilluminated fibres for sky subtraction. (See also Calibrators on "Phase2UI User Instructions: FrodoSpec")
We assume that you have already created the GROUP structure along with timing and observing constraints. There is a separate "creating a simple observing group" tutorial which covers this. You may follow that tutorial up to the point where you click on the "Create New Observation Sequence" button.
![]() Start from the GROUP editing dialogue screen which allows you to add, delete and edit all aspects of the group scheduling, select your group in the tree on the left hand panel.
Start from the GROUP editing dialogue screen which allows you to add, delete and edit all aspects of the group scheduling, select your group in the tree on the left hand panel.
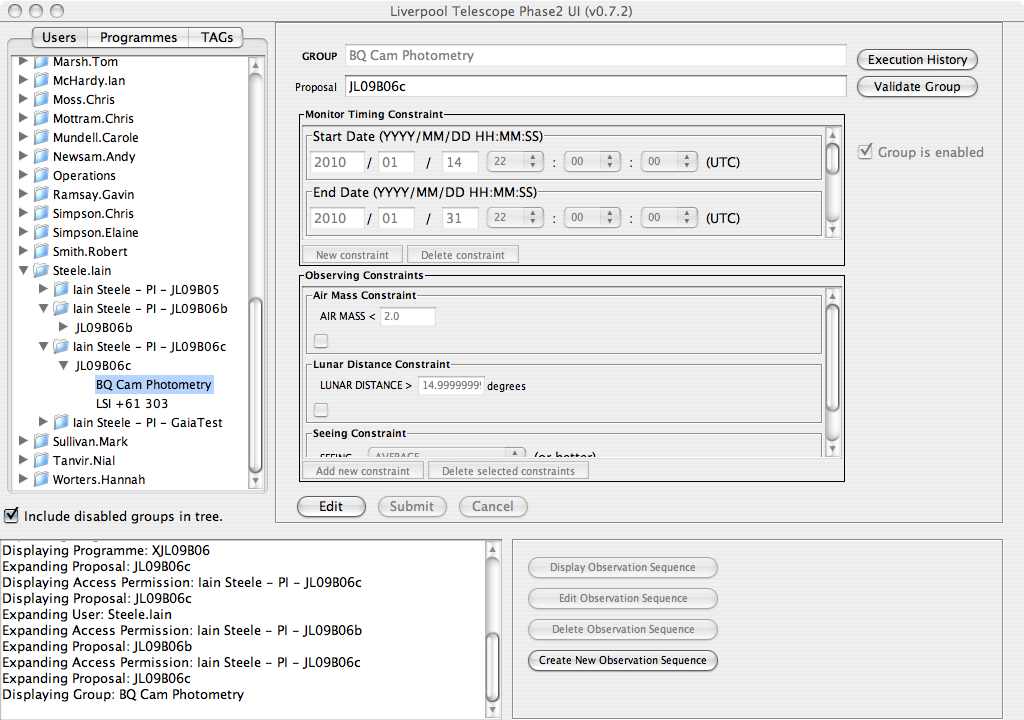
![]() Towards the bottom of the screen, click on the "Create New Observation Sequence" button to bring up the wizard selection dialogue.
Towards the bottom of the screen, click on the "Create New Observation Sequence" button to bring up the wizard selection dialogue.
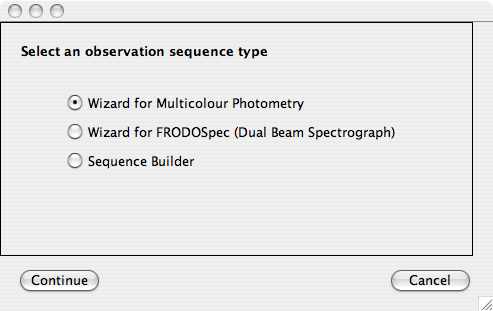
![]() Select "Wizard for FRODOSpec" and press "Continue".
Select "Wizard for FRODOSpec" and press "Continue".
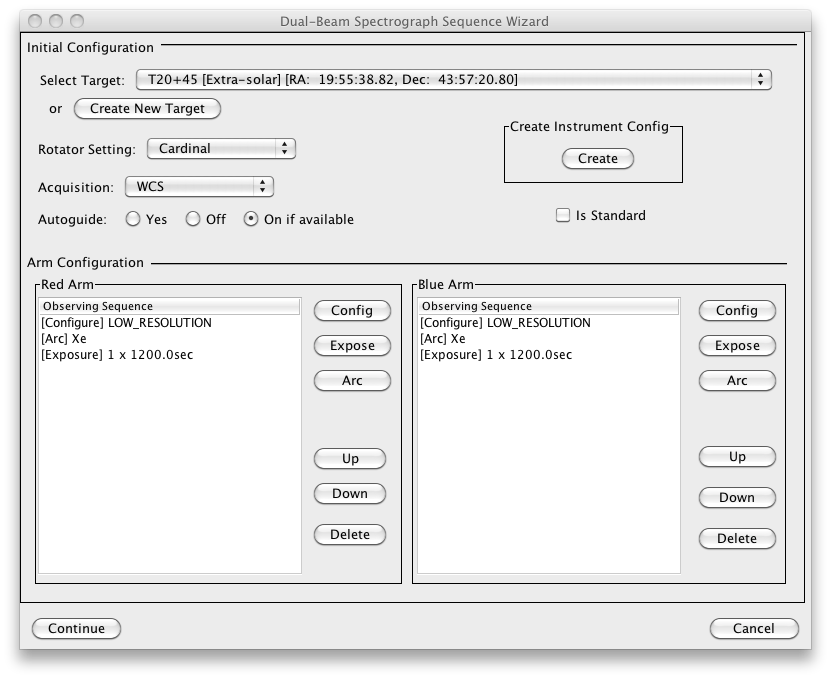
![]() Select your science target from the drop down list or create a new one using the "Create New Target" button.
Select your science target from the drop down list or create a new one using the "Create New Target" button.
![]() Select the rotator mode. This is in almost all cases "CARDINAL". See Rotator Setting on "Phase2UI UserInstructions: FrodoSpec" for detailed discussion.
Select the rotator mode. This is in almost all cases "CARDINAL". See Rotator Setting on "Phase2UI UserInstructions: FrodoSpec" for detailed discussion.
![]() Select an acquisition mode. This would be WCS unless your target is an isolated bright (< 8th mag) star. See FRODOSpec webpages and Acquisition on "Phase2UI UserInstructions: FrodoSpec" for detailed discussion.
Select an acquisition mode. This would be WCS unless your target is an isolated bright (< 8th mag) star. See FRODOSpec webpages and Acquisition on "Phase2UI UserInstructions: FrodoSpec" for detailed discussion.
![]() Select your required autoguider mode. In this case we have elected to use the autoguider if possible, but not to abandon the observation of the autoguider should fail.
Select your required autoguider mode. In this case we have elected to use the autoguider if possible, but not to abandon the observation of the autoguider should fail.
![]() In the "Red Arm" panel, click "Config" and select the instrument configuration you wish to use. If you have not yet created any suitable FRODOSpec configurations, you can use the "Create Instrument Config" button in the upper panel to do so now. Staying in the "Red Arm" panel, click "Arc", select "Xe" from the drop down list and "Create" to add the arc to the sequence. To complete the "Red Arm" sequence, click "Expose", set your integration time and "Create".
In the "Red Arm" panel, click "Config" and select the instrument configuration you wish to use. If you have not yet created any suitable FRODOSpec configurations, you can use the "Create Instrument Config" button in the upper panel to do so now. Staying in the "Red Arm" panel, click "Arc", select "Xe" from the drop down list and "Create" to add the arc to the sequence. To complete the "Red Arm" sequence, click "Expose", set your integration time and "Create".
![]() Repeat for the "Blue Arm" so that the group contains an instrument configuration, arc and exposure for each arm.
Repeat for the "Blue Arm" so that the group contains an instrument configuration, arc and exposure for each arm.
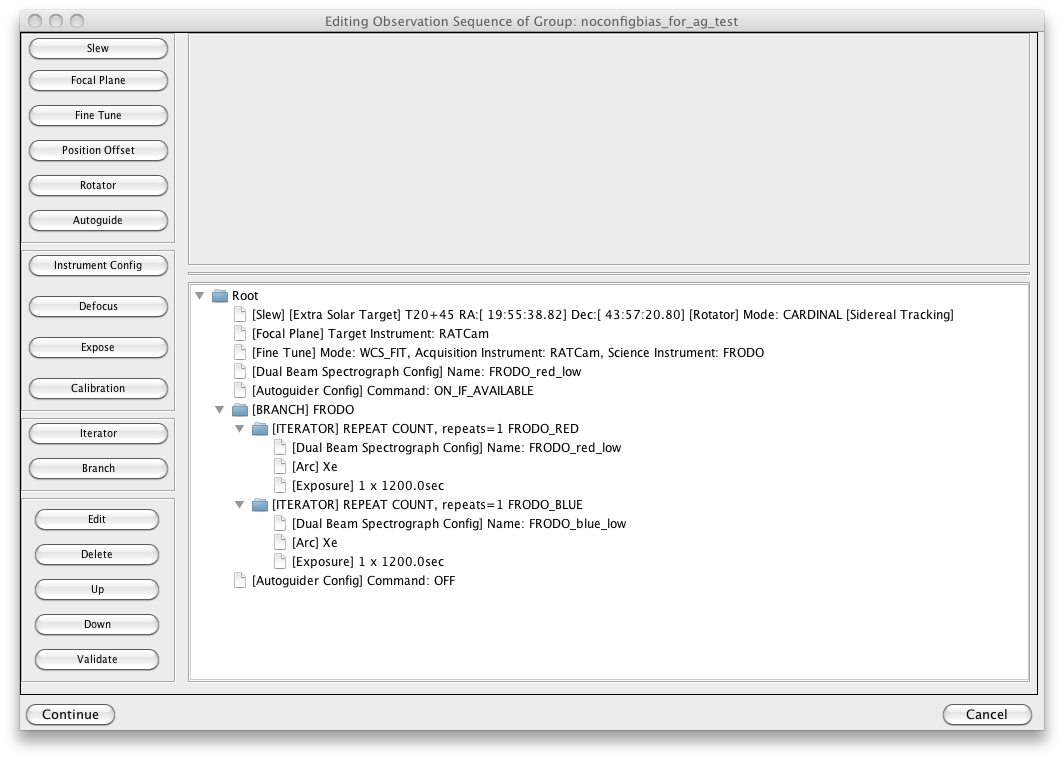
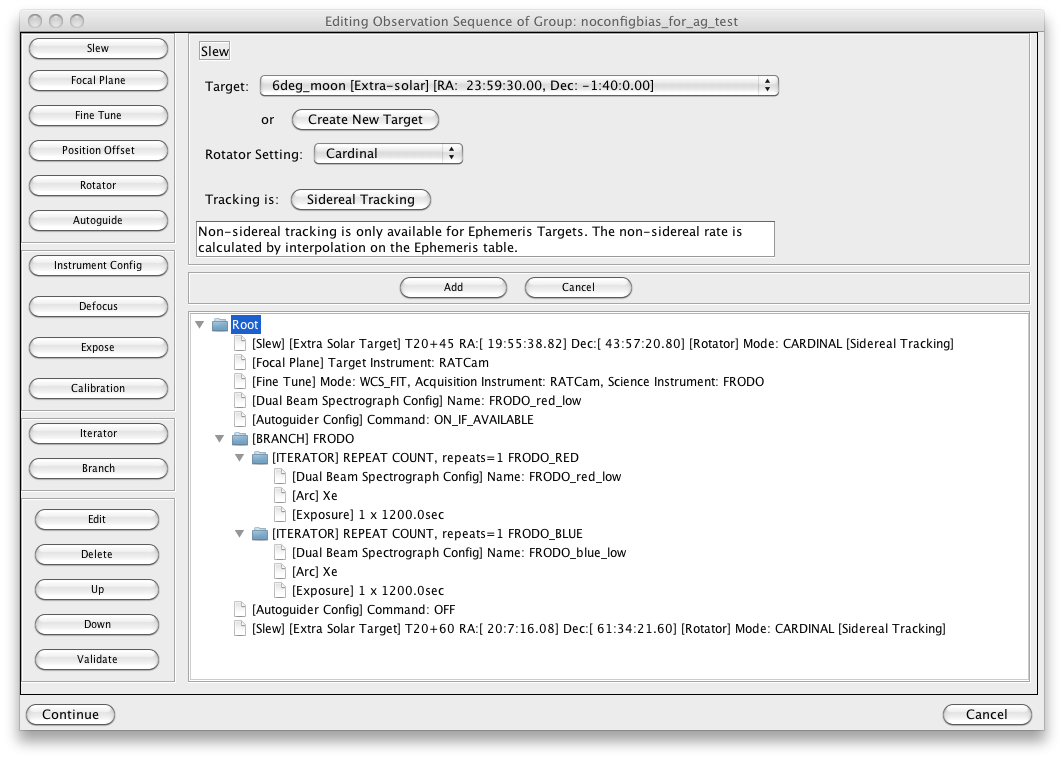
![]() Click "Continue" and "OK" to submit the sequence to the database. A dialogue will appear showing the full sequence you have just created. The FRODO branch can be expanded or collapsed. Check it all looks correct and click "Continue" to dismiss.
Click "Continue" and "OK" to submit the sequence to the database. A dialogue will appear showing the full sequence you have just created. The FRODO branch can be expanded or collapsed. Check it all looks correct and click "Continue" to dismiss.
![]() You now have a simple FRODOSpec sequence created. By using the wizard we have allowed the software to automatically create the core structure of the sequence for us. This provides a template we can easily copy when we add the second target.
You now have a simple FRODOSpec sequence created. By using the wizard we have allowed the software to automatically create the core structure of the sequence for us. This provides a template we can easily copy when we add the second target.
![]() On the GROUP editing screen you will now see that the "Create New Observation Sequence" button is greyed out because a sequence already exists. You may now click the "Edit Observation Sequence" button to bring up the general Sequence Editor and add the second target.
On the GROUP editing screen you will now see that the "Create New Observation Sequence" button is greyed out because a sequence already exists. You may now click the "Edit Observation Sequence" button to bring up the general Sequence Editor and add the second target.
![]() The Sequence Editor is arranged in three panels:
The Sequence Editor is arranged in three panels:
- Bottom
The sequence as it currently exists is represented by a tree structure in the lower-right panel. Some elements (branches and iterators) may be expanded and contracted. Any element in this tree may be selected by clicking on it and then edited, deleted or reordered within the sequence using the buttons at the bottom of the left panel. - Left
Each command that can be issued has a separate button. These are mostly low level instructions which perform a single function within the telescope or instrumentation. Some are slightly more complicated. For example "Slew" incorporates the slew command itself along with setting the cassegrain derotator mode and any non-sidereal tracking rate if required. The buttons in this left panel are context sensitive and not all will be available at all times. Commands which cannot be issued in the current context are greyed out. - Top
When an element is being added or edited, any options relating to that command appear in the upper-right panel.
![]() We want to add an observation of a second target. To do this we can copy the sequence which the wizard created though in our particular case we will not use the autoguider since our target is a large patch of clear sky. Also there is no need to take another arc because the spectrometer is not getting physically reconfigured. It is bench mounted and hence does not suffer any flexure when the telescope was repointed to the new target.
We want to add an observation of a second target. To do this we can copy the sequence which the wizard created though in our particular case we will not use the autoguider since our target is a large patch of clear sky. Also there is no need to take another arc because the spectrometer is not getting physically reconfigured. It is bench mounted and hence does not suffer any flexure when the telescope was repointed to the new target.
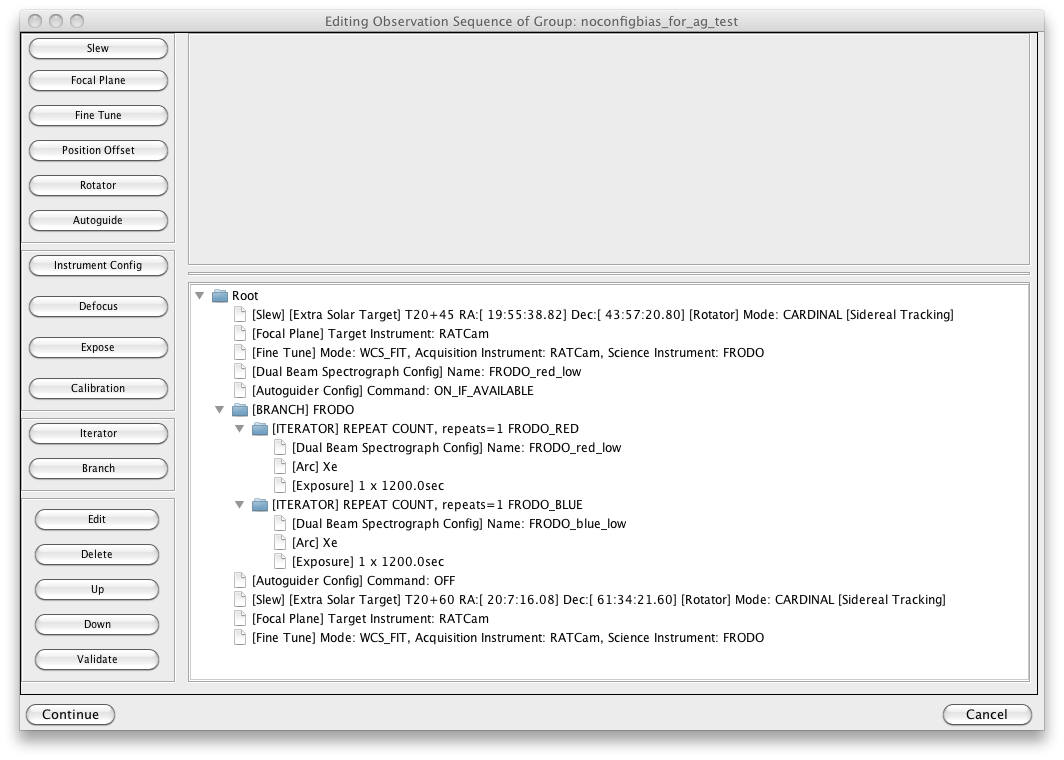
![]() Since we want to add commands to the end of the sequence, click on the top-level "Root" in the sequence tree structure. If you wanted to add extra new commands within the sequence you may select any item in the tree structure and the new command will be inserted after the selected item.
Since we want to add commands to the end of the sequence, click on the top-level "Root" in the sequence tree structure. If you wanted to add extra new commands within the sequence you may select any item in the tree structure and the new command will be inserted after the selected item.
![]() Click the "Slew" button at the top left in order to add a new slew command. Choose the target from the drop down list or "Create New Target". Select suitable options as done previously and then "Add" to add the command to the sequence.
Click the "Slew" button at the top left in order to add a new slew command. Choose the target from the drop down list or "Create New Target". Select suitable options as done previously and then "Add" to add the command to the sequence.
![]() Continue to build up the sequence using the "Focal Plane" and "Fine Tune" buttons from the left hand panel. In the "Fine Tune" dialogue this example selects to use RATCam as the acuisition camera and to acquire onto FrodoSpec. Since the commissioning of IO:O, that would now be a better default choice as the acquisition camera. Again we will use the WCS astrometric fit. As mentioned above, we will not use the autoguider this time.
Continue to build up the sequence using the "Focal Plane" and "Fine Tune" buttons from the left hand panel. In the "Fine Tune" dialogue this example selects to use RATCam as the acuisition camera and to acquire onto FrodoSpec. Since the commissioning of IO:O, that would now be a better default choice as the acquisition camera. Again we will use the WCS astrometric fit. As mentioned above, we will not use the autoguider this time.
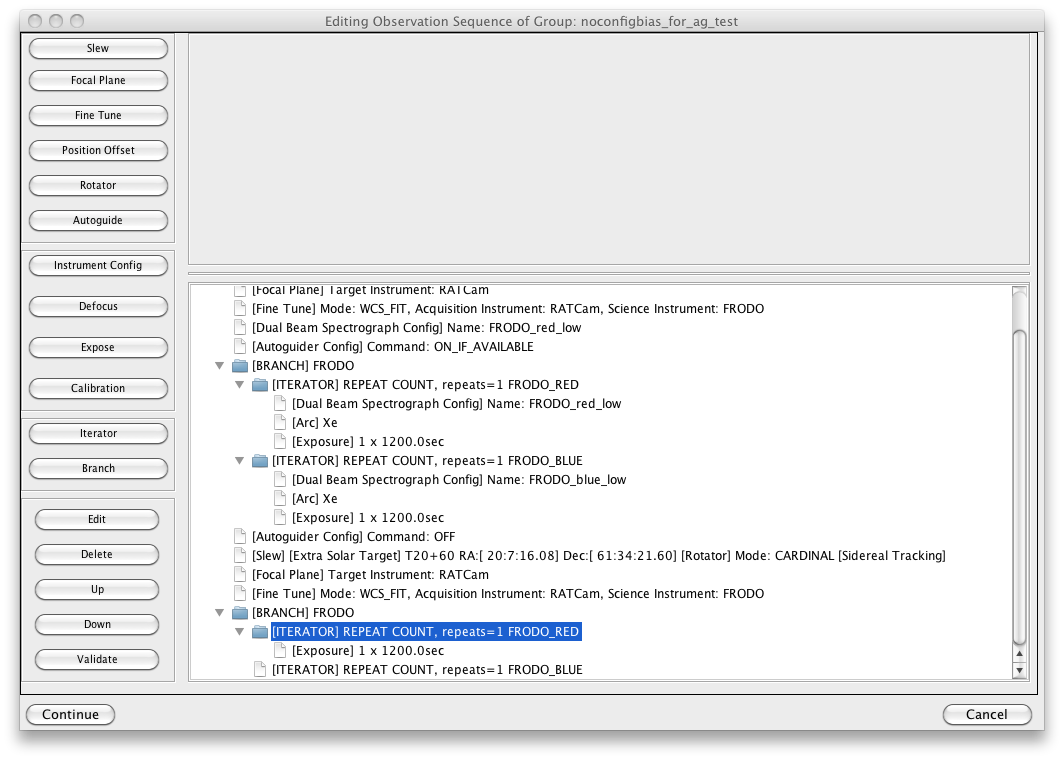
![]() To create the FrodoSpec observations, first click "Branch" from the left panel in order to branch the control sequence for the red and blue arms. Select "FRODO" from the drop-down list and "Add" to submit. In the lower sequence tree panel click on the expansion symbol (small triangle or + sign) next to the newly created branch and it will expand to show separate FRODO_RED and FRODO_BLUE arms just like those that already exist for the first target. We will add commands to FRODO_RED first, so click on that item within the tree in order to highlight it. Click "Expose" in the left hand panel, set the integration time and "Add". You should now have an exposure included in the red arm of the branch.
To create the FrodoSpec observations, first click "Branch" from the left panel in order to branch the control sequence for the red and blue arms. Select "FRODO" from the drop-down list and "Add" to submit. In the lower sequence tree panel click on the expansion symbol (small triangle or + sign) next to the newly created branch and it will expand to show separate FRODO_RED and FRODO_BLUE arms just like those that already exist for the first target. We will add commands to FRODO_RED first, so click on that item within the tree in order to highlight it. Click "Expose" in the left hand panel, set the integration time and "Add". You should now have an exposure included in the red arm of the branch.
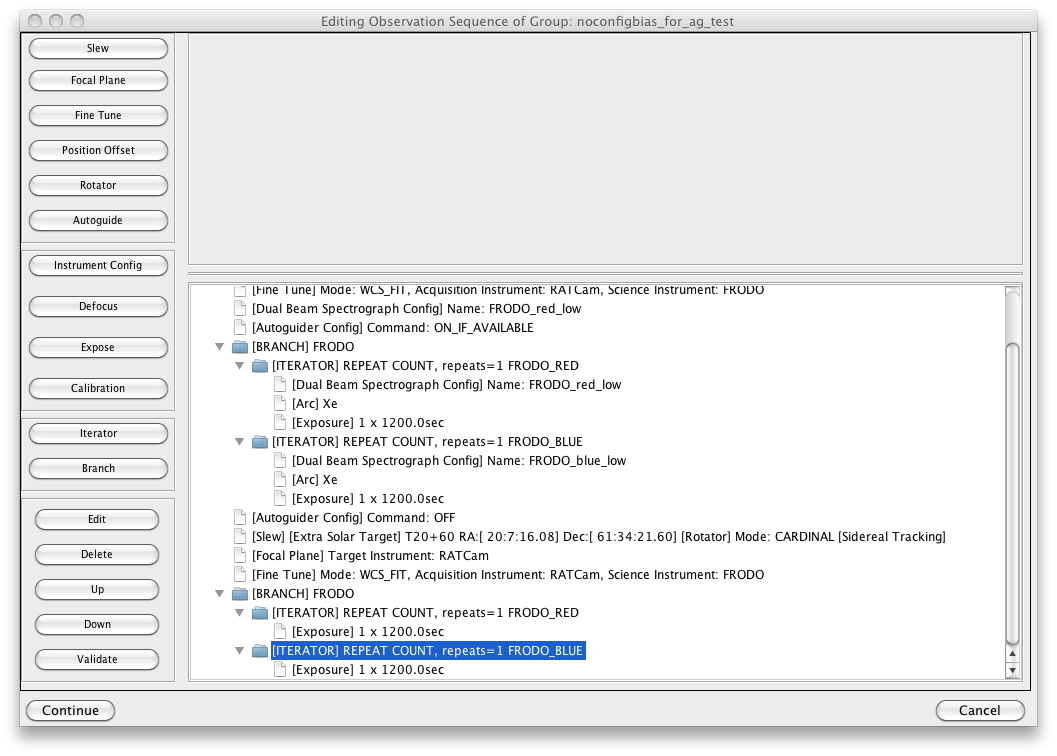
![]() Click on the new FRODO_BLUE branch to highlight it and add an exposure to that in the same way. The entire two target sequence is now complete.
Click on the new FRODO_BLUE branch to highlight it and add an exposure to that in the same way. The entire two target sequence is now complete.
![]() Before submitting the sequence it is always important to validate the sequence. Click the "Validate" button in the lower left corner. In this case the validator has found an error in the sequence. If submitted in this manner, the group would be rejected by the telescope as unobservable and never attempted.
Before submitting the sequence it is always important to validate the sequence. Click the "Validate" button in the lower left corner. In this case the validator has found an error in the sequence. If submitted in this manner, the group would be rejected by the telescope as unobservable and never attempted.
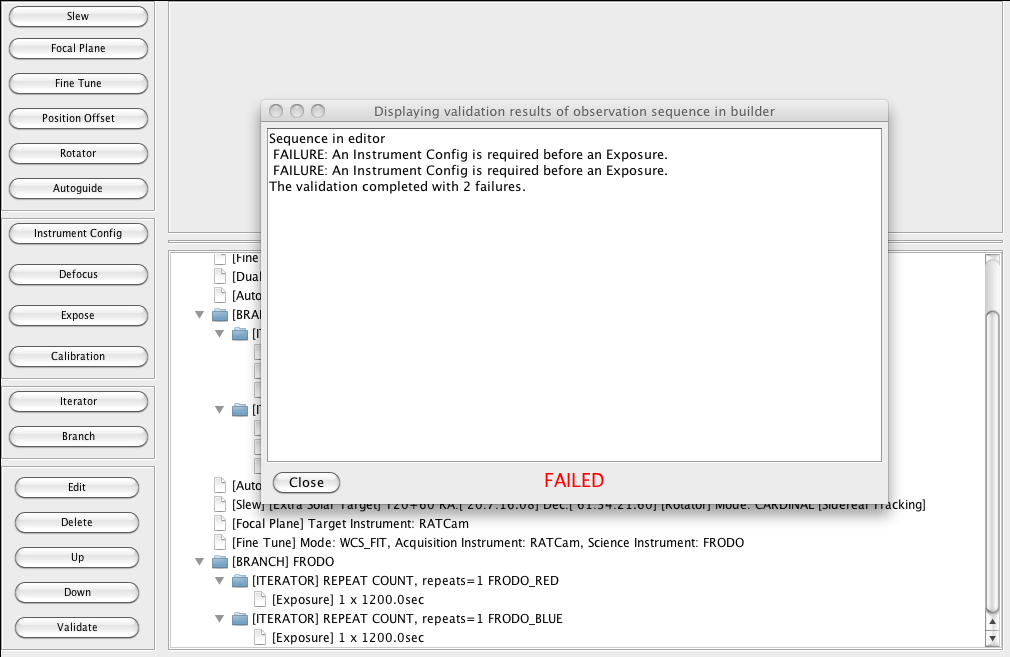
![]() Even though we are not reconfiguring the spectrometer, it is still required that each branch contains an explicit instrument config command. Otherwise there is no way for the RCS to know that we do in fact want to take another spectrum. Though it may seem obvious in this case, it would be entirely valid for us to have slewed to a different target in order to obtain an image with one of the other instruments. To correct this error we will need to add instrument configs to both branches.
Even though we are not reconfiguring the spectrometer, it is still required that each branch contains an explicit instrument config command. Otherwise there is no way for the RCS to know that we do in fact want to take another spectrum. Though it may seem obvious in this case, it would be entirely valid for us to have slewed to a different target in order to obtain an image with one of the other instruments. To correct this error we will need to add instrument configs to both branches.
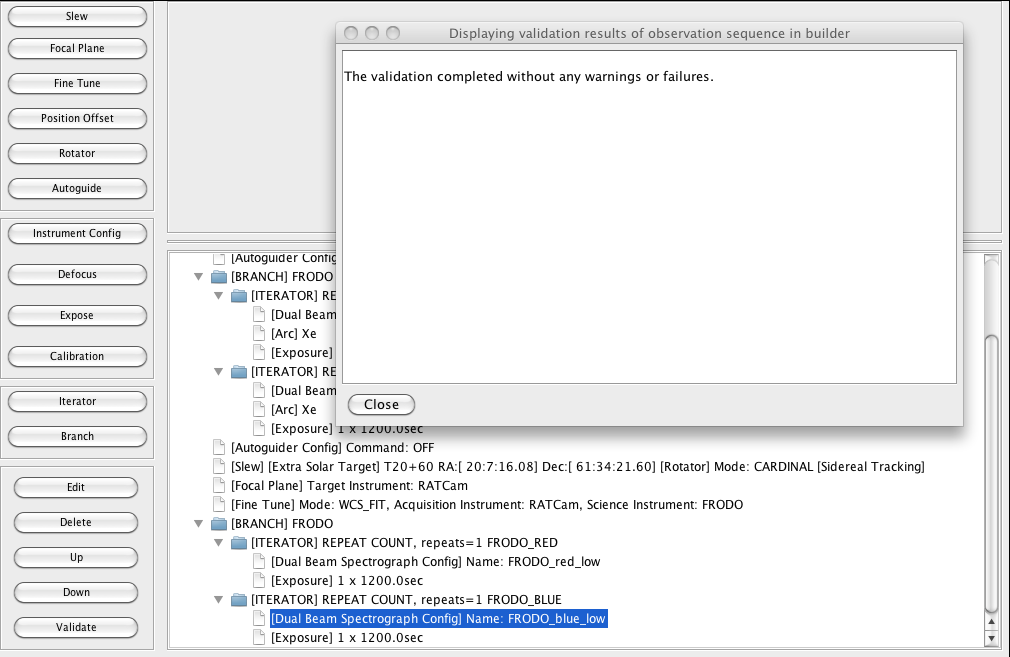
![]() Click on the new FRODO_RED branch to highlight it. Click the "Instrument Config" button, select from the drop down list and "Add". The config has been added by default to the bottom of the list, so select that newly added config command within the tree and use "Up" to move it up above the exposure. Repeat for the FRODO_BLUE branch. When you finally click "Validate" again, the group is now shown as being legal and can be submitted for observation.
Click on the new FRODO_RED branch to highlight it. Click the "Instrument Config" button, select from the drop down list and "Add". The config has been added by default to the bottom of the list, so select that newly added config command within the tree and use "Up" to move it up above the exposure. Repeat for the FRODO_BLUE branch. When you finally click "Validate" again, the group is now shown as being legal and can be submitted for observation.
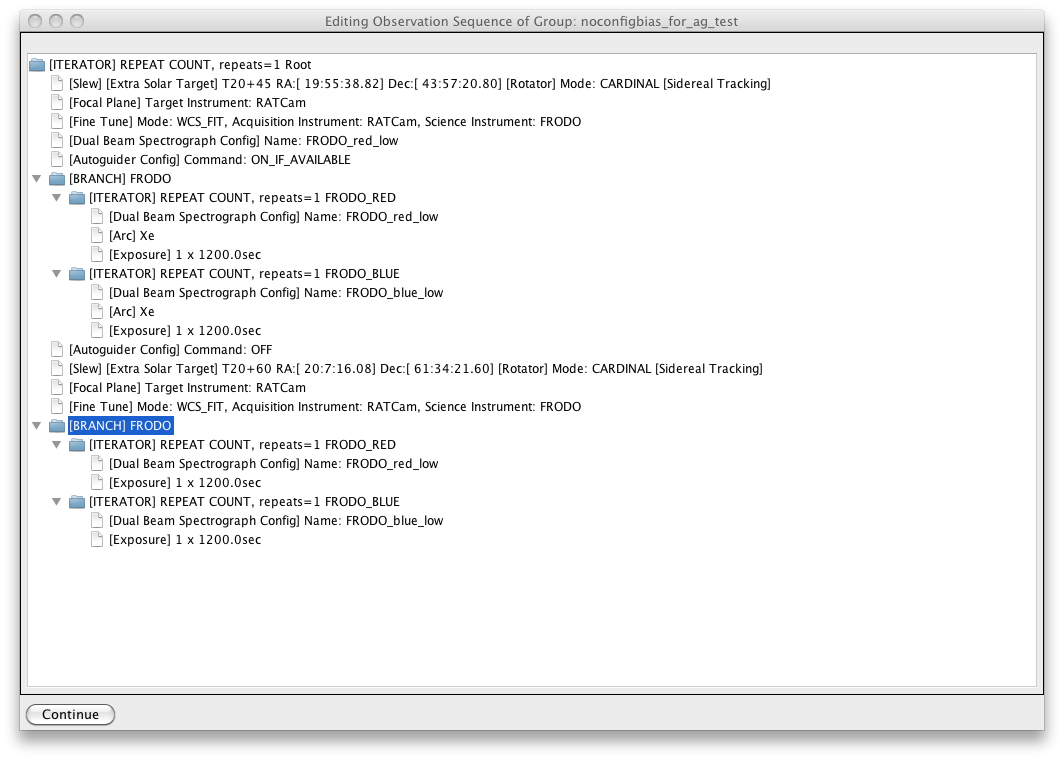
![]() Click "Continue" in the bottom left corner of the Sequence Editor and then "OK". The information dialogue will appear as before showing the full sequence as it was submitted. You can expand and contract each branch to check their contents and then "Continue" to dismiss. This will return you to the GROUP editing screen.
Click "Continue" in the bottom left corner of the Sequence Editor and then "OK". The information dialogue will appear as before showing the full sequence as it was submitted. You can expand and contract each branch to check their contents and then "Continue" to dismiss. This will return you to the GROUP editing screen.
![]() If you have finished with all your edits you can now click "Validate Group" to ensure we have not broken anything during our edits.
If you have finished with all your edits you can now click "Validate Group" to ensure we have not broken anything during our edits.
![]() Finally select the top level of your proposal name from the tree structure on the left and click "Validate Proposal" as a final check before you exit the application.
Finally select the top level of your proposal name from the tree structure on the left and click "Validate Proposal" as a final check before you exit the application.